← back to projects
Enabling Engineering · Jan 2026 – Apr 2026

Muscle to Music

Some students at the William E. Carter School can't hold an instrument. This one lets them play notes by flexing their jaw or neck muscles. I handled the electrodes and wiring.

Build guide ↓ Demo video ↗ Weekly build log ↗
Client
William E. Carter School
Team
5 engineers
My part
Electrodes and wiring
Core parts
Arduino Uno · Myoware 2.0
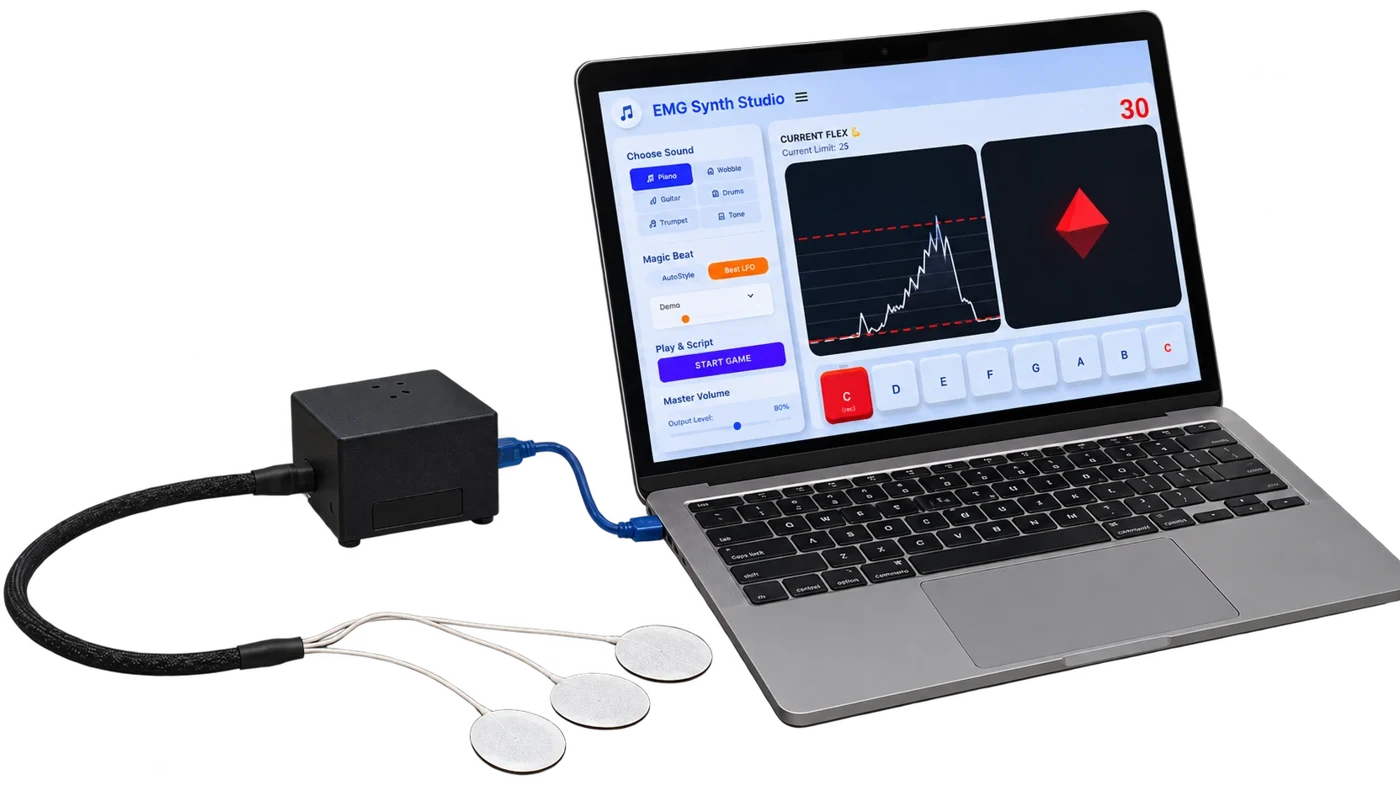
Muscle to Music setup: three round electrodes wired through a braided cable into a black 3D-printed case, connected by USB to a laptop running the EMG Synth Studio app with a live flex graph and note keys // final build
01

The challenge

Some of the students can only move their jaw or head. We wanted them to be able to play in music class anyway.

The William E. Carter School is a Boston public school for students aged 3 to 22 with intensive special needs and complex medical needs. Everyone takes music class, but hand-held instruments don't work for students with limited limb movement.

The teachers asked for a real instrument that plays actual notes, not a game. They also asked for non-stick electrodes, because some students are sensitive to things stuck on their skin. We visited the class before we settled on a design.

02

My part

The hardest problem was noise, and most of it came down to the electrodes.

I was in charge of the connection between the student and the sensor: the electrodes, and the wiring that runs to the Myoware muscle sensors.

The teachers wanted non-stick electrodes, so I led the troubleshooting to find ones that would work. I made a spreadsheet of a lot of different electrode types and set aside money in our budget so we could actually buy and test them. Nothing non-stick gave us a clean signal. Only stick-on electrodes did. So we found a washable, reusable version, and the teachers don't have to keep buying new ones.

To keep noise out of the cables, I soldered the connections between the electrodes and the sensors and made sure every joint was solid. We ran the wires through a nylon braided cover to protect them.

We originally planned to use an ESP32. We switched to an Arduino Uno because it was easier to code and to connect over USB to the custom program on our laptop.

At the end, a student used it in class, and it worked. The teachers were very happy. It was an emotional moment.

03

How it works

When a muscle contracts, it gives off a tiny electrical signal called electromyography (EMG). The instrument picks up that signal on the jaw or neck, cleans it up, and turns each contraction into a musical note in real time.

  1. MuscleJaw or neck contracts
  2. ElectrodesWashable stick-on pads
  3. Myoware 2.0Amplifies and filters the EMG
  4. Link shield3.5 mm cable to the base
  5. Arduino UnoReads and processes the signal
  6. Laptop appPlays the notes
Part 1

The hardware

An Arduino Uno with a Myoware Arduino Shield, in a 3D-printed case. It collects the EMG signal and sends it to the laptop over USB.

Part 2

The human connection

Washable stick-on electrodes, with soldered leads running through a braided cover to the Myoware muscle sensor. This was my part.

Part 3

The software

A laptop app built with a Google app builder. It takes the processed signal from a basic graph to a playable musical instrument.

04

Parts list

PartUsed inWhere to buy
Myoware Muscle Sensor 2.0Human connectionSparkFun ↗
Myoware Link ShieldHuman connectionSparkFun ↗
Myoware Arduino ShieldHardwareSparkFun ↗
Arduino Uno R3HardwareArduino Store ↗
USB A to USB B cableHardwareAmazon ↗
Compact 3.5 mm male-to-male cable (×2)HardwareAmazon ↗
Bar EMG electrodesHuman connectionMFI Medical ↗
Flexible silicone wireHuman connectionAmazon ↗
Heat shrink tubingHuman connectionAmazon ↗
Reusable sticky electrodes, nylon braided wire coverHuman connection—
3D-printed case, foam pads, laptopHardware / Software—
05

Build it yourself

Part 1

The hardware

  • Arduino Uno R3
  • Myoware Arduino Shield
  • USB A to B cable
  • 2 × 3.5 mm male-to-male cables
  • 3D-printed case and foam pads

This part collects the EMG signal and sends it to the laptop. It's mostly simple assembly, but take care to seat the Myoware shield on the Arduino correctly.

  1. Attach the Myoware Arduino Shield to the Arduino board.
  2. Plug the two 3.5 mm cables into two different ports on the Myoware Link Shield.
  3. 3D print the housing.
  4. Fit the Arduino assembly into the printed housing.
  5. Route the cable out through the port.
Part 2

The human connection

  • Myoware Muscle Sensor 2.0
  • Myoware Link Shield
  • Bar and sticky electrodes
  • Wire and heat shrink
  • Nylon braided wire cover

This part carries the signal from the student to the Myoware sensor, and from there into the Arduino for processing. You'll need soldering equipment and a heat gun.

  1. Cut off the white snap connectors that come with the reusable sticky electrodes. These become an adapter that works with both bar electrodes and sticky electrodes.
  2. Solder about 3–4 ft of wire to each cut-off snap connector to lengthen the leads, which attach to the Myoware muscle sensor.
    • Use a different color for one wire so it's easy to tell it's the reference (ground).
    • Cover each soldered joint with heat shrink.
  3. Feed all three wires through the nylon braided cover.
Part 3

The software

  • Laptop

The app turns the processed signal into music. At first it only showed the EMG as a live graph. The final version plays real notes, so students can play along with songs.

The code and a demo video are on the team's project site ↗

06

The team

See the rest
of my work.

Muscle to Music is one of several hands-on builds from my time at Northeastern.